Versions Compared

Key

  • This line was added.
  • This line was removed.
  • Formatting was changed.

...

...

...

...

1. System Requirements

Expand
titleSupported Platforms

1.1 Supported Platforms

  • Operating Systems
    - Windows Server@ 2008 R2 SP2
    - Windows Server@ 2012
    - Windows Server@ 2012 R2
    - Windows Server@ 2016
    - Windows Server@ 2019
    - Windows@ 7 SP1 (32-bit or 64-bit)
    - Windows@ 8.1 (32-bit or 64-bit)
    - Windows@ 10, version 1809

  • Firewall Requirement
    - Windows Server
    a) Port 135 (WMI) to Destination and WMI Random port 49152 - 65535 to Spotlight Client
    b) Spotlight requires the network setting “File and Print Sharing” to be enable
    - Database Monitor

    a) Database Port

  • Hardware Require (Minimum)
    - 2 GHz processor (recommended minimum) Platform
    - 4 GB of RAM minimum, 16 GB recommended Memory

The memory required may vary based on the following:
- Applications that are running on your system when using Toad
- Size and complexity of the database
- Amount of database activity
- Number of concurrent users accessing the database

  • Hard Disk space : 800 MB to install Toad, 162 MB to run Toad

Required may vary based on the edition of Toad selected for installation.

  • Microsoft .NET Framework 4.7.1

  • Database Client : When connecting to a DB2 database/subsystem, ensure that you have a DB2 Client or IBM Database Data Server Driver installed.
    - Toad supports DB2 Client versions 9.7.6 through 11.1
    - Toad has been tested with the following versions of the DB2 Client: 9.7.6, 9.7.9, 10.1.0, 10.1.2, 10.1.3,
    10.5.0, 10.5.2, 10.5.3, and 11.1.0

  • Browser Require
    - Internet Explorer@ 11 or later

  • Supports screen : screen resolutions up to 3200 x 1800 and display DPI settings up to 150%

Expand
titleUser Requirements

1.2 User Requirements

  1. User Requirements to Install Toad

  • Only Windows Administrators and Power Users can install Toad.

The following exceptions exist for Power Users:

  • A Power User cannot install Toad on a computer running Windows Vista Enterprise. This is a Windows limitation because Vista does not support Power User mode.

  • A Power User can install Toad as long as this user belongs to the DB2ADMNS or DBUSERS group.

  • If an Administrator installs Toad, the Administrator can share the Toad shortcut icon on the desktop and menu items with any user—a Power User, Restricted User, Vista standard user—on the computer.

  • If a Power User installs Toad, a Restricted User cannot do the following:
    - l Associate file extensions.
    - l View the Toad shortcut icon on the desktop or the Toad menu options in the Windows Start
    menu.
    As a workaround, Restricted Users can create a shortcut to Toad from the install directory and place
    the shortcut on their desktop.

2. User Requirements and Restrictions for Running Toad

The following describes the requirements and restrictions for users who launch and run Toad:

  • A Windows Power User or Restricted User must belong to the DB2ADMNS or DB2USERS group. To add the user to one of these groups, select Start | Control Panel | Administrative Tools | Computer
    Management | System Tools | Local Users and Groups | Groups | DB2ADMNS or DB2USERS.

  • A Windows Power User or Restricted User does not have the authority to add or remove DB2 catalog
    entries using the Toad Client Configuration wizard. However, these users can use the Import Profile
    function in the Toad Client Configuration wizard to import catalog entries to Toad.

  • To take full advantage of Toad for DB2 LUW functionality, the user ID specified in the Toad connection profile for each DB2 for LUW database connection requires the authorizations listed in the following document: ToadDB2LUWAuthorizations.pdf

  • As a minimum requirement to manage a DB2 for z/OS subsystem in Toad, the user ID defined in the
    Toad connection profile for the subsystem must either have SYSADM privileges or SELECT privileges
    on the DB2 catalog tables. For a complete list of authorizations (and corresponding GRANT statements) a user requires to take full advantage of Toad for DB2 z/OS functionality, refer to the following document: ToadDB2zOSAuthorizations.pdf

  • To create or modify the QuestSoftware.ToadSecurity table to enable Toad Security, the user who
    maintains this table must have privileges to create, insert, update, and delete it. All other users need only the ability to read the QuestSoftware.ToadSecurity table to use Toad Security features.

  • (The ability to define RACF, Unix, and Linux groups as Toad Security roles works with DB2 for LUW 9 or later databases and DB2 for z/OS 8 or later subsystems.

View file
nameToadDB2zOSAuthorizations.pdf
View file
nameToadDB2LUWAuthorizations.pdf

  • Required user authorities or privileges for each DB2 database you want to monitor

2. Installation

Expand
titleInstall TOAD for DB2

2.1 Install TOAD for DB2

There are several ways to find the installers :

  1. Finding Installers : Download product from the Website or Log in Support Portal

  2. Run the installer Click run as Administrator , Click Next

  3. Click accept the license agreement , Click Next

When installing Toad using Quest Software Installer on Windows 7 64-bit, Program
Compatibility Assistant may appear with “This program might not have installed correctly” message. Select This program installed correctly to continue installation.

4. Select “ Toad File Extensions format” , Click Next

Image Modified

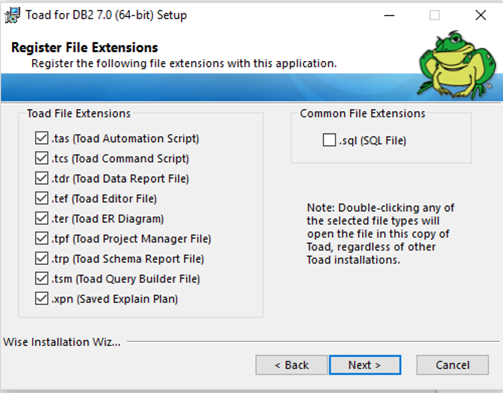
5. Check Allow saving passwords to prohibit users from saving their passwords in Toad. Click Next

Image Modified

6. Click Finish and Click Yes for restart the computer.

Expand
titleInstall SQL Optimizer for DB2

2.2 Install SQL Optimizer for DB2

SQL Optimizer for IBM DB2 LUW lets you tune the SQL used in the DDL for triggers, views, or materialized query tables and the SQL included in packages. You can also tune the SQL on which you are working in the Editor.

To Install SQL Optimizer for DB2 on a Windows machine :

  1. Finding Installers : Download product from the Website or Log in Support Portal

  2. Run the installer Click run as Administrator , Click Next

  3. Click accept the license agreement , Click Next

  4. Select Directory Location for install, Click Next

  5. Begin installation process, installation complete Click Finish

Expand
titleSpecify Application Data Directory Location

2.4 Specify Application Data Directory Location

The default location cannot be modified from within the application. Toad provides two methods to change the default location: by using a Registry setting or by using a command switch in a Toad shortcut.

Use the Registry setting method to change the application data directory from Roaming to Local. Use the command switch method to change the location to any new path.

See the following table for default (Roaming) and resulting (Local) directory path.

Note

All current Toad settings will be lost after applying this Registry setting unless you manually copy
the settings files from the default location (Roaming directory) to the new location (Local directory). Copy the settings files BEFORE you add the Registry setting and BEFORE opening Toad.

Image Modified
  • To change Toad Application Data directory location using a command-line switch
    You can override the default Application Data directory by running Toad with the command switch:
    Toad.exe --datadir="YourNewDirPath"

To instruct Toad to always use the new directory path, add the command switch and the new directory path to a Toad desktop shortcut. Then use the desktop shortcut when opening Toad.

  1. To add the command switch, right-click the Toad shortcut and select Properties.

  2. Enter the command switch and add the directory path in quotes (replace "YourNewDirPath" with your
    directory path).

3. Licensing

Expand
titleActivate License Key- TOAD For DB2

3.1 Activate License Key- TOAD For DB2

To enter your license key

  1. Select Help | Licensing from the menu (ALT+H+L).

  2. Review the following for additional information:

Image Modified

License key determines the edition of Toad (Pro, Xpert, etc.) and will enable the functionality accordingly. In many cases, if functionality is disabled within Toad, you may not have an appropriate license to use it. When Toad is running, you can see which components are licensed by selecting Help |About.

Expand
titleUpgrade Toad

3.3 Upgrade Toad

  • Manual Upgrade Toad
    1. Run appropriate Toad installer (ToadForDB2_version) from the DVD or downloaded file.
    2. Select the products you want to install and click Install.

  • If you are upgrading from a previous version of Toad, you are prompted to migrate your settings the first time you start Toad. The settings files include database connections, layout customizations, shortcut keys, and options customized in the Options pages.

  • To migrate the settings again, remove or rename the current version's Application Data folder and migrate the files from the previous version's Application Data folder.

  • Upgrade Automation Scripts to Newer Version of Toad
    An automation script is compatible with the version of Toad in which the script was created. If you want to open and/or modify a script using a newer version of Toad, you must upgrade the script.
    Toad automatically prompts you to upgrade the script the first time you open it in the newer version.
    To upgrade an Automation script :

    1. Open the script in Toad. Toad prompts you to upgrade the script.

...

    1. Image Added

    2. To upgrade the script, select Yes.

Note

If you upgrade an automation script, it will no longer be compatible with earlier versions of Toad.

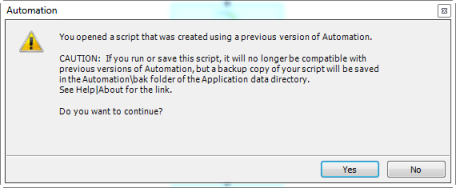
3. Select No (and do not elect to save the script), to keep the script compatible with the previous
version.
4. If you selected Yes, Toad upgrades your script and saves a backup copy of the original script in
the following location:
<application data directory>\Automation\bak
5. If the script you upgraded is also scheduled, you must migrate the scheduling task, otherwise the
upgraded script will fail to run.

  • Migrate Scheduling Tasks to Newer Version of Toad
    Each scheduled Automation script uses a Windows scheduling task. The scheduling task specifies which version of Toad to use by specifying the version's application path. Toad provides you with two easy ways to migrate your scheduled scripts' scheduling tasks when you upgrade Toad.
    First, Toad prompts you to migrate scheduling tasks upon initial launch of the application after installation. Next, you can migrate scheduling tasks at any time using the Job Manager.

  • If you upgrade a previously-created script by opening it in a newer version of Toad, you must also migrate the scheduling task to the newer version.

  • If you install the newer version of Toad side-by-side with the older version, previously-created,
    scheduled scripts will continue to execute using the older version, until you migrate the scheduling tasks (provided that you do not open the scripts in the newer version).

  • To migrate scheduling tasks upon initial launch
    1. After upgrading Toad, and upon initial launch of the application, the Migrate Scheduled Tasks
    dialog opens.
    2. Select the scheduled tasks (scheduled Automation scripts) to migrate to the new version of Toad.
    3. Click OK to close the dialog.
    4. Toad immediately prompts you for your Windows password. Enter your password to migrate the
    scheduled tasks.

  • To migrate scheduling tasks using the Job Manager

    1. Select Tools | Administer | Job Manager.

    2. Click on the Job Manager toolbar.

    3. Select the scheduled tasks to migrate and click OK.

Only currently-scheduled tasks (enabled or disabled) are listed in the Migrate Scheduled
Tasks dialog.

Toad immediately prompts you for your Windows password. Enter your password to migrate the
scheduled tasks.

  • Manually Edit Scheduling Tasks
    On occasion you may need to modify the application path in a Windows scheduling task. You can do this by manually editing the scheduling task using the following procedure.
    To manually edit a scheduling task

    1. In the Job Manager (Tools | Administer | Job Manager), right-click a task and select Edit Task.

    2. To change the version of Toad used to run the script, in the Actions tab, change the folder name in the toad.exe path.

4. Managing Licenses

Expand
titleMove License to another computer

4.1 Move License to another computer

To move the Toad application and license from one user to another user on a different computer.

  1. Launch Toad on the old computer.

  2. Select Help | Register Toad.

  3. Copy the authorization string and site message. (Case sensitive).

  4. Install Toad on the new computer

  5. Launch Toad on the new computer and it will prompt for registration.

  6. Type in the authorization string and site message noted in Step 3 above.

  7. Uninstall Toad from the old computer.

Expand
titleUninstall Toad for DB2

4.2 Uninstall Toad for DB2

If you uninstall Toad, it may not uninstall completely. When you use Toad, you create new files such as SQL scripts, data output, or temp files, etc. The following types of files are not removed when you uninstall:

  • Any new files you create

  • Any copies of files you make for backup purposes

  • Settings files

To uninstall Toad

  1. Open the Windows Control Panel and select Programs and Features|Add/Remove Programs.

  2. Select the product that you want to uninstall.

  3. Click Uninstall.

Support Chanel : Support Portal